I always get suckered into those point-of-purchase-displayed royal icing sugar cookies. You know, the ones at Starbucks, decorated in the theme of the nearest popular holiday? That hard, sugary icing gets me EVERY. TIME.
Upon investigation a few years back, I discovered that recreating these diabetic-coma-inducing treats seemed like way too much work, so I abstained from homemade in favor of the overpriced coffee-shop variety. But after my macaron-baking adventure, I gained some newfound patience in the baking department and decided to give it a whirl. Just like the macarons, royal icing sugar cookies are an art and a science—and almost every recipe out there completely oversimplified things, especially when it came to the decorating. Wing it without the fine-print instructions and you’ve got a surefire Pinterest Fail on your hands.
So before you flit off to AllRecipes.com for the highest-rated generic sugar cookie recipe, keep these tips on hand.
1 ) Use a good sugar cookie recipe. I like this recipe from Sweetopia.
2) Learn how to make cookies that hold their shape. The aforementioned recipe includes instructions on making cookies that hold their shape. Here they are, plus more from Sweetopia:
-
- Roll the dough out between two pieces of parchment paper and then chill in the fridge for an hour. If you’re like me and always look for a shortcut (freezer!!) be careful—there’s a fine line between perfectly chilled and frozen to the point that the dough cracks when you cut it. Cut the chilled dough into shapes immediately and then re-chill the cut cookies for at least 10 minutes. Re-roll the excess dough and repeat.
- Don’t over-mix the butter and sugar. Over-mixing can cause excess air, which will cause fluffier cookies that spread easier.
- No baking powder.
- Use the correct amount of sugar and higher quality or European-style butter. Too much sugar and low-quality butter can both cause spreading because the sugar becomes liquid when it heats up and cheaper butter has higher water content.
- Use thicker cookie sheets and parchment paper.
- Thinner cookies spread less (Sweetopia recommends 3/4 to 1 cm-thick cookies)
3) Start with thick icing. Many of the icing recipes I found were too runny for outlining or detail work. My advice is, start with less water and add more as needed. I went with:
4 tablespoons egg white powder
1 lb confectioner’s sugar
1/4 – 1/2 cup water
Mix all ingredients, starting with 1/4 cup water and adding more veeeeerrrry slowly as needed (one tip I saw recommended adding water via spray bottle—genius!). Mix on low in a stand mixer for several minutes. The icing you use for outlining should be about the consistency of toothpaste. Here’s where the next step comes in …
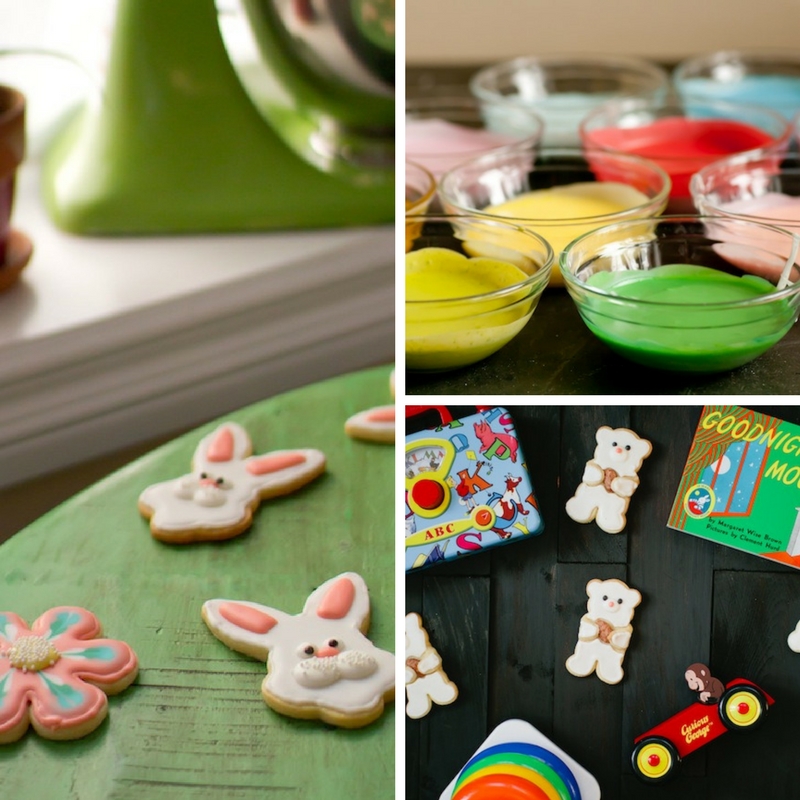
4) When it comes to decorating, plan ahead. Once you’ve got your big batch of royal icing (which should be the proper consistency for outlining at this point) partition it out in bowls. This is where you’ll have to make some decisions and (gasp!) commit to a color scheme. For example, if you’re making Christmas trees, you’ll want a lot of green icing for the tree, a little brown for the trunk and an even smaller amount of a few other colors for the tree decorations. You’ll likely need an outlining icing and a flood icing (the icing that fills the cookie in) for each color, EXCEPT the colors you plan to use only for detailing (the buttons, nose, eyes, etc. on a snowman, for instance). For those detail colors, you’ll only need icing of an outlining consistency.
Here’s where some people make the rookie mistake of dividing the uncolored icing into separate bowls for outlining and flood, diluting the flood icing appropriately and then trying to match the colors to each other after the fact. Nope. Start with one bowl for each color, mix in your food coloring as appropriate (for extra-saturated colors, use powdered dye so as not to dilute the icing too much) and THEN divide it into two bowls and dilute one for flood icing. Add water slowly to one bowl of each color to create the flood icing (which should be about the consistency of hot fudge sauce).
5) Have the proper tools. Don’t panic—there’s no need for expensive baking tools. I use gallon ziplock bags for the icing (although, you can purchase these or these if you want to get fancy.) and toothpicks to spread the flood icing. Put the bags in a cup/glass and pull the bag over the edge of the cup (as if you were lining a trash bin … lovely!), then fill it with the icing and cinch the bag closed with a rubber band. Snip the corner of the bag when you’re ready to begin icing. To decorate your cookies, outline each one with the outlining icing, then fill the cookies in with the flood icing. Use a toothpick to gently push the flood icing around to fill in any holes. I let my outline icing harden before flooding, but it’s become clear to me, thank to this Sweetopia tutorial, that you’ll get a smoother, more seamless result if you flood immediately.
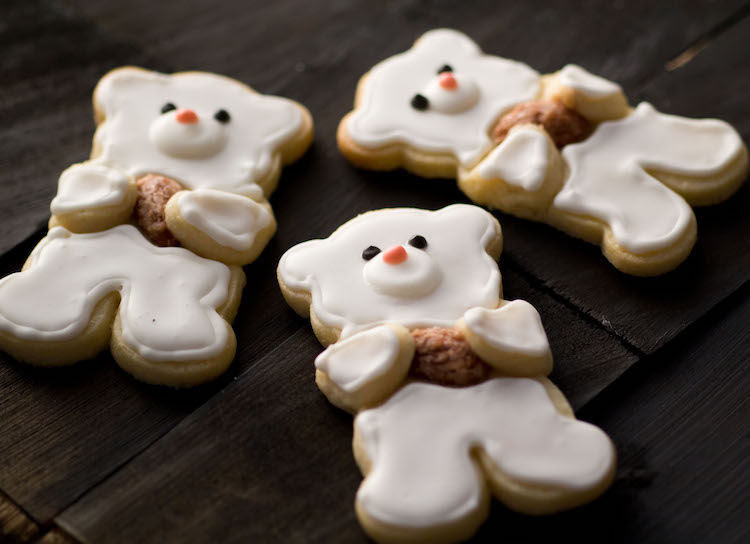
I made the bear cookies you see above using a bear cookie cutter and then folding the arms around cinnamon-sugar almonds before baking.
Now all I need to do is find a way to use all 101 of the cookie cutters in the massive kit I impulsively bought on Amazon …
Happy icing!

4 Comments
Natalia
That’s what I was looking for! I’m planning to make the Star Wars cookies. Got some cutters at William Sonoma and would be more colorful to use icing and food colors. Even though I found some tips from a book, your post is incredibly helpful. Thank you!
nil
this rabbit cookies look very nice and the icing on it looks really smooth…but when I apply icing on cookie there are too much air bubbles in the icing…could you pleas give some advice to get smooth icing 🙂
thank you 🙂
admin
You may be overmixing the icing. You can also use a toothpick to poke out any air bubbles!
Tiffany @ A Kitchen Fable
That icing is perfect! I love the colours, and those bears are super cute!